Creating an Edmodo Account
Step 1
In order to use Edmodo, you must first create an account for yourself. The first step is to go on www.edmodo.com.
Step 2
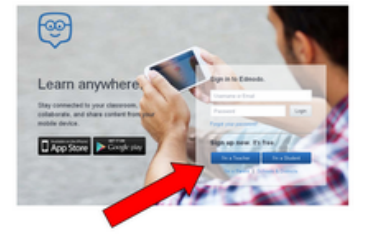
Next, as you see below, the site gives you two options. You can sign in, or sign up to Edmodo. Sign up by clicking on “I’m a teacher”. Notice that you can click on “I’m a Student” as well which is how to create a student account. You will go through the same procedures when showing your students how to create an account, but you must create your account and group first.
In order to use Edmodo, you must first create an account for yourself. The first step is to go on www.edmodo.com.
Step 2
Next, as you see below, the site gives you two options. You can sign in, or sign up to Edmodo. Sign up by clicking on “I’m a teacher”. Notice that you can click on “I’m a Student” as well which is how to create a student account. You will go through the same procedures when showing your students how to create an account, but you must create your account and group first.
Step 3
After clicking “I’m a Teacher”, the next screen below will pop up. Fill in the appropriate information, and select a password that is easy for you to remember. Please read and review Edmodo’s Terms of Service and Privacy Policy links. Once you are finished, click on the white box stating your agreement, and click on “Sign up”.
After clicking “I’m a Teacher”, the next screen below will pop up. Fill in the appropriate information, and select a password that is easy for you to remember. Please read and review Edmodo’s Terms of Service and Privacy Policy links. Once you are finished, click on the white box stating your agreement, and click on “Sign up”.

Step 4
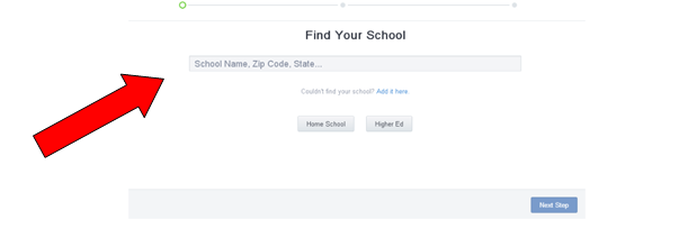
Now you must select your school that you work for. You can search it by adding the school’s name, zip code, and state. If it is not listed, you may add your school. It also gives you the option if you are involved in home school, or higher education. When you find your school, click “next step”.
Now you must select your school that you work for. You can search it by adding the school’s name, zip code, and state. If it is not listed, you may add your school. It also gives you the option if you are involved in home school, or higher education. When you find your school, click “next step”.
Step 5
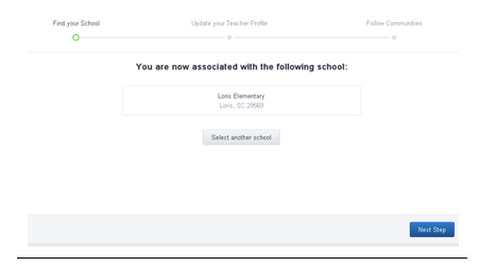
Edmodo will confirm your school by showing the screen below. Next, click “Next Step”.
Edmodo will confirm your school by showing the screen below. Next, click “Next Step”.
Step 6
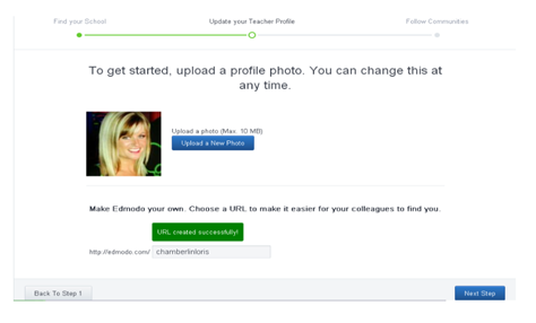
The next screen will allow you to upload a picture for your profile. It is important to select a picture so people may identify you personally with your account. You also need to create a personalized URL for your profile. Once you have selected your URL, a message will pop up indicating if the URL your chose is available. If it is, click “Next Step”. If it is not, then you must select a different URL. This URL address will make it easier for colleagues to find you on Edmodo.
The next screen will allow you to upload a picture for your profile. It is important to select a picture so people may identify you personally with your account. You also need to create a personalized URL for your profile. Once you have selected your URL, a message will pop up indicating if the URL your chose is available. If it is, click “Next Step”. If it is not, then you must select a different URL. This URL address will make it easier for colleagues to find you on Edmodo.
Step 7
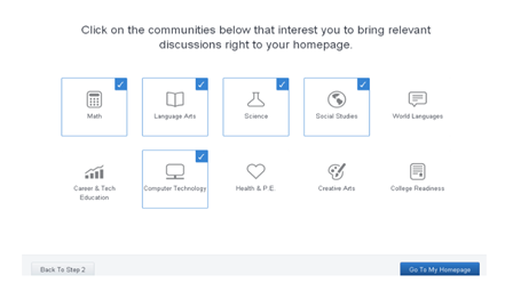
Now select different communities that interest you. This will bring relevant discussions to your homepage that you might find useful in your specific field of education. When you are finished, click “Go To My Homepage”.
Now select different communities that interest you. This will bring relevant discussions to your homepage that you might find useful in your specific field of education. When you are finished, click “Go To My Homepage”.
Congratulations! You have created your Edmodo account. The next screen you see is your home screen. You will learn about the details of navigation in Topic 1.2. Now that you have created your profile, let’s create a group for your students. Steps and information will be provided in Topic 1.1.2.
